
This is our “road” today.
It has rained.
Nonstop.
All.
Friggin’.
Week.
I am going to have to either kayak or swim to get the mail…and the trash???
Forget about it.
This is our “road” today.
It has rained.
Nonstop.
All.
Friggin’.
Week.
I am going to have to either kayak or swim to get the mail…and the trash???
Forget about it.

That about sums it up…
Homemade Yummy Yogurt in my Crockpot, bitches.
Do you know what I did (well, probably, I wrote it in the title of this post)?
Yes, I did…I made yogurt…in my crockpot!
I am starting to–trying to–get in the habit of eating more yogurt. The reason being, it’s good for you (I know, I know, you hear it all the time, you are what you eat, blah blah blah).
But you want to know the REAL reason? I really I like yogurt. I think it’s tasty and it’s really not all that expensive–until you consider each one of those little plastic yogurt cups is a BUCK, and that adds up. Also, those little containers make a lot of garbage and I’m trying to not put so much plastic in the landfill.
So–if you are a regular reader of my ramblings–you know that I am a rampant Googler, always trying to learn how to make “stuff” (a modern-day homesteader with the luxury of technology). I know that pretty much everything has been pretty much done before so, why not learn and experiment with other people’s successes/failures?
The thing is, with my Googling, I always look for the absolute EASIEST method of making ANYTHING (my criteria ALWAYS includes “easy” in the search bar). A lot of the time, I modify even the easiest of the easy recipes and directions (you can call it lazy or call it efficient. Whatever!).
Anyway, yesterday I had the bright idea of making my OWN yogurt…and let me tell you, there is A LOT of DIY yogurt recipes out there in Internet-land. Some seemed really hard…water baths, digital timers, sanitizing stuff…having to MEASURE STUFF???? I don’t know about you, but:

My A.D.D. thrives in the kitchen so, I know better than even attempting something that complicated. It would be an epic fail…so I kept on Googling.
And Googling.
And Googling some more.
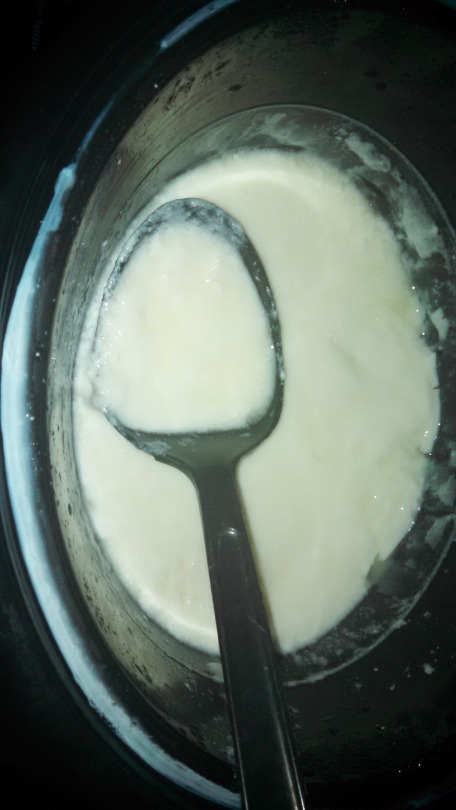
And then I found it. A totally easy method of making DIY yogurt. In my crockpot. Using NO kitchen utensils, no other exotic do-dads…nothing but a timer (and I have that notification-thing-y on my phone!).
I can do that! And I did. And it was yummy! So I thought I would share with you my Stupid Easy Crockpot Yogurt recipe:
Well, that’s all the stuff you’ll need. Now all you need is some time, and A LOT of it (I highly recommend starting this whole process by AT LEAST by 4 or 5 pm). Now, let’s get started:
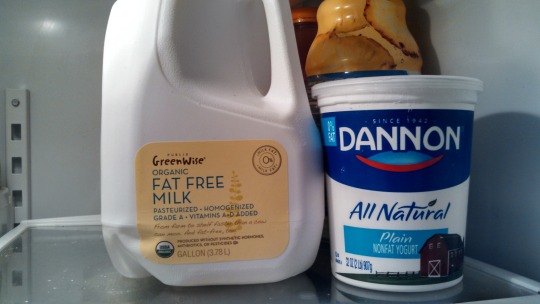
FIRST, pour about a half gallon-ish of milk into your crockpot, then:
NEXT,

THEN,
FINALLY,
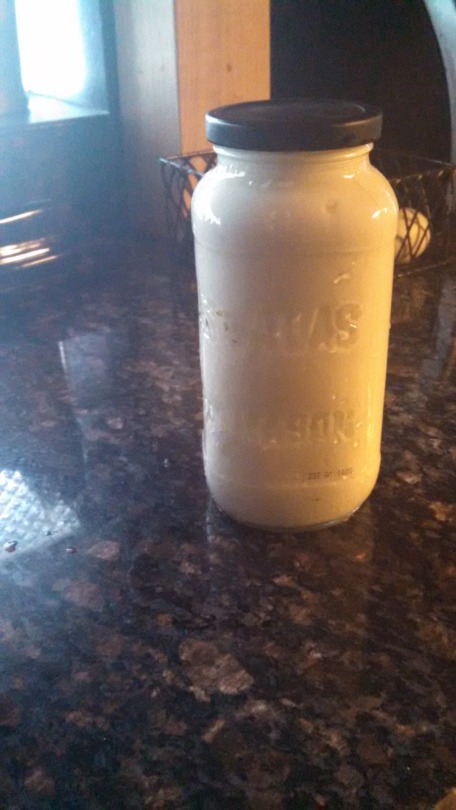
The yogurt should be good for a week or two. If you want to make some more, either buy some more yogurt or save about a half cup of the yogurt you just made and repeat!
Pretty stupid easy, huh?

Yesterday was the first official day of Hurricane Season 2016. Here’s to hoping this year will be like the last 8. Nada!
Bug bites...the who, what, when where, why, and how.
When will I EVER learn????
DON’T wear flip flops in the yard. EVER.
And while I am at it, don’t slather on fruity-smelling body lotion before I go outside, either…especially THIS time of the year.
You know it IS that time of the year…those FUN Florida summers when you start sweating as soon as you open the door to go outside. You know, when you melt like a Popsicle just walking to your car (which, by the way, how come NO ONE in Florida parks his/her car in a garage? Me included. Dumb dumb dumb, but that’s another rambling for another day.).
Anyway, in the last 3 days I have been bitten by:
Most of the time I can just ice and elevate the victimized bodypart for a bit (while cursing the whole time) and then move on with my day; however, there are some evil bites that put me down for the count.
To make my (and Billy’s) life a little easier, I have created this little chart and wanted to share it with you (I have it in a printable PDF format for easy reference.).

It’s not all the little buggers we have flying and crawling around here, but it’s a great start to the most plentiful and painful ones.


![<p>Ok, so it’s a LITTLE early to start celebrating Memorial Day (and it IS a Tuesday), but we are making homemade ice cream tonight (for dinner)! And where I come from, that’s the official activity we do to welcome summer!</p>
<p>I just bought this little gem–an electric homemade ice cream maker (yeah, I know that’s kinda cheating)–on clearance for $25. It’ll pay for itself after 3 uses!</p>
<p>I called my mom and she shared with me the tastiest–and easiest–ice cream recipe. It’s amazing and requires a shit-ton of eggs…and we have PLENTY of fresh ones around here. I’ll share the recipe with you (beware it contains raw eggs, if that makes you queasy, then this recipe is not for you).</p>
<p>So, here we go. Take out your blender (or, as we call it around here, the fruity drink-maker) and throw in:</p>
<p>- 10 eggs (we made it an even dozen, why not?)<br/>
- a can of SWEETENED condensed milk<br/>
- 1ish or 2ish cups of sugar, depending how sweet you like your ice cream<br/>
- 1 ½ teaspoons of vanilla extract (again, like the sugar, it all depends on how vanilla-y you like your ice cream [or you could completely bag the vanilla and try other flavors…squeeze some chocolate syrup or Nestle Quik in there. Or how about some Torino syrup, like white chocolate, coconut, or caramel? Crush up some Oreos for cookies and cream. You are only limited by your imagination, puke, huh?]).</p>
<p>Now, blend the crap out of it then pour it into the maker container. After you do that, pour enough milk (we use skim because that’s what we drink around here…no judging) to the container’s fill line (it has one, they all do).</p>
<p>Now I don’t know about you, but I don’t read directions–never have and probably never will–so let me save you some grief:<br/>
1. The paddle doesn’t move (only the container spins).<br/>
2. Save yourself some $$$, fill up a few empty milk gallon jugs with water a couple a days beforehand and freeze them. You can hammer away at them for the crushed ice.<br/>
3. ANY salt will do to sprinkle on the ice (to melt it). We used pool salt. And don’t be chincy with it, either…layer ice then salt, ice then salt.<br/>
4. And lastly, don’t forget to poke around the ice and salt once in awhile. You can use a big spoon, paint stirrer, a stick… whatever.</p>
<p>Plug it in, flip the ON switch, and let it do its thing for 45ish minutes (or if you have a hand crank one, give yourself a good arm workout for approximately the same amount of time).</p>
<p>When it’s done, enjoy (the stuff stuck on the paddle is the tastiest. [Is it really? I don’t know.]). Oh, and another great thing about this recipe, the leftovers (if you have any) don’t turn into an ice brick when you put in the freezer! It stayed “scoop” soft for over a week the last time we made it.</p>]( //64.media.tumblr.com/7d4bfd59471605997c75383c1fbcd84b/tumblr_o7pd9sBPDp1tka4pco1_1280.jpg )
Ok, so it’s a LITTLE early to start celebrating Memorial Day (and it IS a Tuesday), but we are making homemade ice cream tonight (for dinner)! And where I come from, that’s the official activity we do to welcome summer!
I just bought this little gem–an electric homemade ice cream maker (yeah, I know that’s kinda cheating)–on clearance for $25. It’ll pay for itself after 3 uses!
I called my mom and she shared with me the tastiest–and easiest–ice cream recipe. It’s amazing and requires a shit-ton of eggs…and we have PLENTY of fresh ones around here. I’ll share the recipe with you (beware it contains raw eggs, if that makes you queasy, then this recipe is not for you).
So, here we go. Take out your blender (or, as we call it around here, the fruity drink-maker) and throw in:
- 10 eggs (we made it an even dozen, why not?)
- a can of SWEETENED condensed milk
- 1ish or 2ish cups of sugar, depending how sweet you like your ice cream
- 1 ½ teaspoons of vanilla extract (again, like the sugar, it all depends on how vanilla-y you like your ice cream [or you could completely bag the vanilla and try other flavors…squeeze some chocolate syrup or Nestle Quik in there. Or how about some Torino syrup, like white chocolate, coconut, or caramel? Crush up some Oreos for cookies and cream. You are only limited by your imagination, puke, huh?]).
Now, blend the crap out of it then pour it into the maker container. After you do that, pour enough milk (we use skim because that’s what we drink around here…no judging) to the container’s fill line (it has one, they all do).
Now I don’t know about you, but I don’t read directions–never have and probably never will–so let me save you some grief:
1. The paddle doesn’t move (only the container spins).
2. Save yourself some $$$, fill up a few empty milk gallon jugs with water a couple a days beforehand and freeze them. You can hammer away at them for the crushed ice.
3. ANY salt will do to sprinkle on the ice (to melt it). We used pool salt. And don’t be chincy with it, either…layer ice then salt, ice then salt.
4. And lastly, don’t forget to poke around the ice and salt once in awhile. You can use a big spoon, paint stirrer, a stick… whatever.
Plug it in, flip the ON switch, and let it do its thing for 45ish minutes (or if you have a hand crank one, give yourself a good arm workout for approximately the same amount of time).
When it’s done, enjoy (the stuff stuck on the paddle is the tastiest. [Is it really? I don’t know.]). Oh, and another great thing about this recipe, the leftovers (if you have any) don’t turn into an ice brick when you put in the freezer! It stayed “scoop” soft for over a week the last time we made it.

Other than a shaved front paw and fanghole on her head, Daisy is pretty damn close to her old, spry self.
It was Rattlesnake-1, Daisy-0; however, now I’d call it 1-ALL.
Out of poop, something grows.
I did something new this year that I had NEVER done before…grow tomato plants from seeds! Yep, that’s right! I grew tomato plants from seeds…and not just any seeds, seeds that I bought from the Dollar Store (I bought some marigold, cucumber, and basil seeds, too. They were 4 for a $1.).
I was getting sick and tired of spending close to $3 a tomato plant, only to have the vast majority of them die from various bugs, worms, nematodes, diseases, and whatever else. I was also spending a butt-load of $$$ on sprays and other insecticides (probably poisons, even though most say they’re not). I tried making my own “bug-be-gone” stuff, but lets face it, most of that organic stuff just doesn’t get rid of bugs (and sure as hell am not going to sit around the plants and pick off the bugs [someone suggested that to me. Really???]). Anyway, I figured out that the few tomatoes I was getting probably cost me about $5 a piece and I needed to do something about that.
So, back to my seeds.
I nursed those little seeds in little pots until they became little plants, and I was sooooo excited. And when they grew big enough, I picked the 8 strongest plants and put 4 in pots and the rest right into the ground.
Well, let me show you something:
And this:
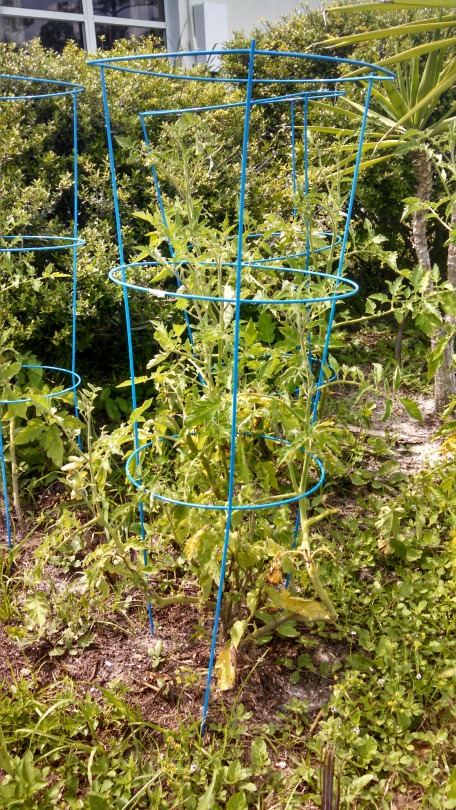
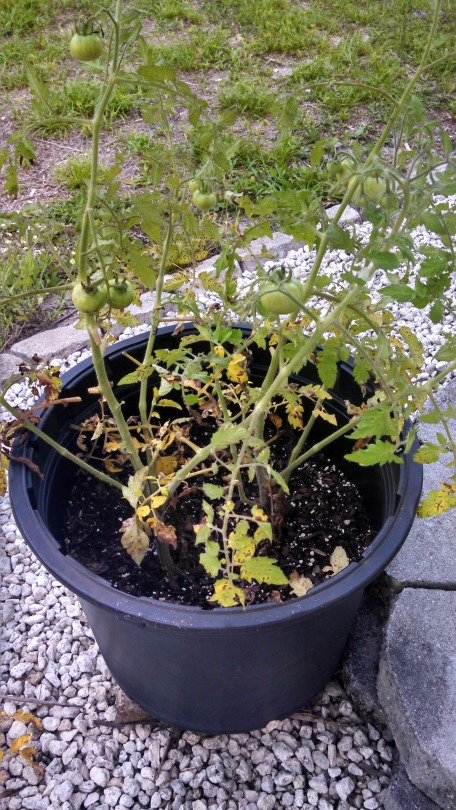
Three months later and they look like that!
Pretty sad, huh?
They are just sickly looking. I have been feeding them, watering them…I even talk to those damn plants and that’s what they look like.
However, let me show you something else:

THAT tomato plant looks great, doesn’t it? Yeah, I know and I have 4 other plants that look just as healthy…and you know where those plants are growing? In my freaking compost cage (where we dump our animal poop and rotten food)!
Yeah, they’re growing in poop!
Can you believe it?!? I didn’t even plant anything in there and I have these gorgeous tomato plants growing. The ones I nurture, look like crap and the ones growing in crap, look great. Typical.
All I can figure is that maybe my chickens pooped out some seeds or I threw something in there that had some seeds in it. I’m thinking it was most probably chicken poop because I always give my girls scraps of food that we don’t eat.
So, out of poop, my tomato plants grow. Maybe that’s the key for gardening down here…just get a big bunch of crap, pile it up, neglect it, wait a little bit and get fresh vegetables.
Make a free website with Yola